Tuesday, 7 November 2017

Prawn Taco's


It's Taco Tuesday!!! 

And what is better than an ordinary taco? A spicy prawn taco, obviously!


Prep time: 30 minutes
Serves: 4 

MAKING THE PRAWNS

 INGREDIENTS:

 
  • 1 packet of prawn meat (700g)
  • Sesame oil
  • 1 tablespoon olive oil
  • 2 tablespoons Robertson's barbecue spice
  • 1 heaped teaspoon garlic powder
  • 1 heaped teaspoon smoked paprika
  • 1 tablespoon soy sauce
  • 3 tablespoons Wellington's sweet chilli sauce
  • 1 teaspoon (or a squeeze) of lemon juice

METHOD:


  1. Mix the prawns with all ingredients (except sesame oil). 
  2. Let it stand about 20 minutes to marinate.
  3. (In the meantime, prep your other taco components.)
  4. Coat your wok with sesame oil and stir fry the prawns on high heat, until cooked - about 10 minutes.

PREP THE OTHER COMPONENTS


INGREDIENTS:

  • 4 taco's (or tortilla's)
  • 2 smallish brinjals, salt & pepper, some olive oil
  • 1 tub hummus
  • 2 carrots - grated
  • 1 avo - sliced
  • 1/4 pineapple - thinly sliced
  • 1/4 red pepper - thinly sliced
  • Sriracha mayo (= sriracha + mayo)

METHOD:


  1. If (like me) you forgot to buy taco's, but have tortilla's - you can turn them into taco's. Simply fold them over the oven shelf, like in the picture. Put the oven on grill mode and WATCH the tortilla's like a hawk. It will go from fine to burnt within a few seconds! Grill for 3-4 minutes. Then set aside on a cooling rack.
  2. Prep the brinjal: Thinly slice the brinjal. Sprinkle with salt and pepper. Coat a non-stick pan with some olive oil and fry the brinjal on medium heat, until cooked - about 3 minutes per side.
  3. Slice the pineapple, red pepper and avo. Grate the carrots.

Assemble the taco:

  1. Smear the bottom of the taco with hummus.
  2. Then layer the components: brinjal first. Then carrots, pineapple, pepper, avo, prawns.
  3. Top with some sriracha mayo. 


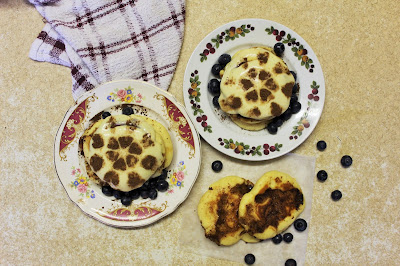
Cinnamon Roll Flapjacks


Sometimes an over-the-top sweet brekkie is all that you need. These flapjacks will just hit the spot.

Delicious doesn't even begin to cover it.

Prep time: 15 minutes
Cooking time:3-4 minutes per side (20-25 minutes in total)
Makes: 18 flapjacks

FLAPJACKS

INGREDIENTS:

 
  • 2 eggs
  • 3 tablespoons sugar
  • 4 tablespoons + 4 tablespoons butter
  • 2 cups cake flour
  • 4 teaspoons baking powder
  • Pinch of salt
  • 1 cup milk
  • 1 teaspoon vanilla essence
  • 1/3 cup caramel sugar
  • 1 teaspoon fine cinnamon

METHOD:


Making the flapjack

 
  1. Melt the butter in the microwave until semi-soft. 
  2. Cream together: 4 tablespoons butter, 3 tablespoons sugar, 2 eggs and 1 teaspoon vanilla essence.
  3. Sift in: 2 cups flour, 4 teaspoons baking powder and a pinch of salt. Mix it through.
  4. Add 1 cup of milk slowly and mix thoroughly.

Cinnamon sugar mixture

 
  1. Put 1/3 cup caramel sugar, 4 tablespoons butter and 1 teaspoon fine cinnamon into a bowl. 
  2. Microwave for 30 second intervals until sugar and butter has melted.

Frying the flapjacks

 
  1. I use my flat toaster to cook the flapjacks. 
  2. Use 1 heaped dessertspoon of batter per flapjack. 
  3. Once you've dropped the scoop of batter on the flat toaster, add a swirl of cinnamon sugar. (Use a spoon or a piping bag)
  4. Cook the flapjacks for 3-4 minutes per side.
 

CREAM CHEESE SAUCE

INGREDIENTS:

 
  • 2 tablespoons butter
  • 1/2 tub smooth cream cheese
  • 3/4 cup icing sugar
  • 1 teaspoon vanilla essence

 METHOD:

 
  1. Mix together 2 tablespoons butter, 1/2 tub cream cheese, 3/4 cup icing sugar and 1 teaspoon vanilla essence. 
  2. Serve the flapjacks in a stack and drizzle with the cream cheese sauce.


Sunday, 5 November 2017

Carrot Cake (Halloween Pumpkin Edition)


As most of my recipes go - I got it from my momma! This is my mom's carrot cake recipe. It's a bit labour-intensive (as is every carrot cake) - coz there's so many ingredients to prepare, but it's totally worth it. 

This recipe is so versatile and can be made into a cake or cupcakes. I usually make them into cupcakes coz cupcakes are always better. But for this Halloween addition, I used 2 Bundt trays and turned the cake into a pumpkin! (as seen on Pinterest obviously!)


Oven: 180'C
Prep time: 30 minutes
Baking time: depends on what size tray you use
                     Cupcakes - 15 minutes (makes about 50)
                     2 standard round baking trays - 1 hour 30 minutes
                     2 bundt trays - 1 hour           
          

INGREDIENTS:


  • 2 cups sugar
  • 2 cups cooking oil
  • 6 eggs
  • 3 cups cake flour
  • 4 teaspoons baking powder
  • 3 teaspoons baking soda
  • 4 teaspoons fine cinnamon
  • 2 teaspoons fine nutmeg
  • 2 teaspoons fine ginger
  • Pinch of salt
  • 5-6 large carrots - grated
  • 4 very ripe bananas - mashed
  • 1 packet walnuts
  • 250g mixed raisins and sultanas
  • 1 tin crushed pineapple

METHOD:


  1. Preheat the oven to 180'C.
  2. Prepare everything first. Grate the carrots - I do it in my mini food processor (coz I'm lazy like that). Mash the bananas. Roughly chop the walnuts. Or alternatively bash the packet of walnuts with a rolling pin (it's a great stress reliever!) - but don't forget to cut a tiny whole in the corner of the packet to let out air. Mix the raisins/sultanas and nuts together with 1/2 cup of flour (this will prevent it from sinking to the bottom of the cake when it bakes)
  3. Using a mixer, cream together the sugar, oil and eggs (added one by one).
  4. Sift in the flour (the remaining 2.5 cups), baking power, baking soda, cinnamon, nutmeg, ginger and salt. Mix it through with the mixer.
  5. Lastly add the carrots, bananas, walnuts, raisins/sultanas and pineapple. Mix it through by hand (use a wooden spoon or colourful spatula). 
  6. If you're making a cake - spray the baking tin liberally with oil spray. I find that oil spray is enough to prevent the cake from sticking to a silicone tin but if you're using a metal cake tin, rather line the bottom with baking paper to prevent sticking. This cake bakes really long coz its so moist. Bake it for about 1 hour 30 minutes. I check it at 30 minutes, 1 hour, 1 hour 15 minutes and 1 hour 30 minutes (coz I'm always so paranoid I'm gonna bake it too dry). Every oven is different, so I would recommend checking at least after one hour. You can always bake it longer if necessary. To check the cake: use a cake tester or just a tooth pick - poke it into the cake, if it comes back clean - the cake is done. 
  7. If you're making cupcakes - I use 1 ice-cream scoop of batter per cupcake. Bake it for about 15 minutes. Check it at 10 minutes.  
  8. To make a "pumpkin" - you just turn the 2 bundt cakes on top of each other.  

Cream cheese frosting:

  • 60g butter/baking margarine
  • 2 tubs smooth cream cheese
  • 4 cups icing sugar
  • 1 tablespoon vanilla essence
  • Few drops of lemon juice (optional)
  1. Use room temperature butter. 
  2. Mix the butter and cream together. 
  3. Sift in the icing sugar (one cup at a time) and mix it through. 
  4. Add the vanilla essence. 
  5. You can add a few drops of lemon juice depending on how sour you want the frosting to be. 
  6. If the frosting is too runny, leave it in the fridge to stiffen a bit (or freezer - but then check on it regularly).
  7. I usually use it as is and pour it over the cake (and pipe it onto the cupcakes). To garnish: sprinkle with some finely chopped walnuts and glitter (of course!)
  8. For the pumpkin, I added orange food colouring. And made the stem and leaves from store-bought fondant. 


Chocolate Mousse & Oreo Cheesecake Parfait (Halloween Graveyard Pudding)


This one is for all the chocolate-lovers out there. It's my new fave! The combo of chocolate mousse and Oreo cheesecake is just to die for (get it? coz it's a graveyard! LOL)

I made them in standard dessert bowls and they were waaaay too big. It was too sweet to finish, but I don't have the perfect size glass/mini bowl so I had to settle. 

You can easily make this in one large bowl for larger crowds.


INGREDIENTS:


  • 2 boxes of Oreos
  • 1 tub smooth cottage cheese
  • 1 tin condensed milk
  • 250ml fresh cream
  • 1 tablespoon vanilla essence
  • 2 boxes of Woolworth's chocolate mousse powder
  • 1.5 cups milk

METHOD:

Base

  1. Crush 10 Oreos (I use a rolling pin to smash them into fine pieces) and divide it between your bowls, making sure you leave some left overs for garnishing at the end.

Cheesecake

  1. First prep your ingredients: whip the fresh cream, and crush 1 packet of Oreos into fine pieces.
  2. Mix together: cottage cheese, condensed milk and vanilla essence. 
  3. Fold the whipped cream and crushed Oreos.
  4. Then put it in the freezer for 1 hour to half-set.

Mousse

  1. Put the mousse powder in a mixing bowl. 
  2. Slowly add the milk and start mixing (with an electric mixer) at the same time. 
  3. As you beat it, it gets thicker. Beat it for 5 minutes. 
  4. Put it in the fridge while you're waiting for the cheesecake to half set.

Assemble

  1. Put the Oreo crumbs in as the base.
  2. Top with half the chocolate mousse and half the Oreo cheesecake, and then repeat.
  3. To garnish, sprinkle crushed Oreos and crushed Whispers (as sand). Split the remaining Oreos and cut them the resemble the shape of a tombstone. Use a food marker to write on the tombstones (I use Nicoletta). Place the tombstones on top of the dessert.


Friday, 3 November 2017

Sweet & Sticky Chicken Stir Fry


This meal is a great alternative for when you're lazy but not in the mood for take-outs. It's like home-made Simply Asia. And literally takes 20 minutes to prepare and cook.

This is the low-carb, noodle-free version but you can always add egg noodles to it if you really want to. 

INGREDIENTS:


  • Woolworth's ready packed stir fry veggies
  • Any other veggies you want to add - broccoli, peppers, pineapple, sugar snaps
  • Soy sauce
  • 4 chicken breasts
  • 1 tablespoon sesame oil
  • Robertson's chicken spice
  • Garlic (chopped)
  • Teriyaki sauce
  • Lappies sticky rib sauce
  • Sesame seeds

METHOD:


  1.  Prepare everything first. Cut the chicken breasts into strips. Wash and chop all the veggies. 
  2. Use a wok (I used an electric wok but a stove-top wok is fine too). Heat the sesame oil. Once it's hot, add the chicken. Sprinkle over some chicken spice, garlic, and teriyaki sauce - I literally just sprinkle it over, so I don't have an exact measurement (Don't add too much chicken spice, coz this makes it salty).
  3. Stir fry the chicken for 2-3 minutes. 
  4. Then add the Lappies sauce (once again, just a dollop) and some sesame seeds.
  5. Stir fry for another 2-3 minutes.
  6. Take the chicken out of the wok and set it aside. Leave the sauce behind in the wok.
  7. Add broccoli (and any other veggies that cook longer) to the left over sauce in the wok. Mix it through and then close the lid. Let it steam for 2-3 minutes.
  8. Then add the rest of the veggies and a sprinkle of soy sauce. Close the lid and steam for 5 minutes or until the veggies are cooked. I like my veggies crunchy but just cook it longer to soften them.
  9. I like to serve it separately but at this point, you could add the chicken back and mix it in with the veggies. You could also add egg noodles if you want (which you would have had to pre-soak in boiling water for 20 minutes). 
  10. Serve it with an extra sprinkle of sesame seeds and garnish with some micro-herbs.


Tuesday, 24 October 2017

Roasted Butternut with Cranberry & Feta


This is a wonderful and warm winter side dish. I initially only used to make this on special occasions but we love it so much that it is now a regular feature in our menu.

Prep time: 5 minutes
Bake time: 1 hour

INGREDIENTS:

  • 1 medium-sized butternut
  • Salt and pepper
  • 1 teaspoon ground cinnamon
  • 1/2 teaspoon ground nutmeg
  • 1/2 teaspoon ground ginger
  • 1/2 cup dried cranberries
  • 1.5 rounds of feta - crumbled into smaller pieces
  • Honey

METHOD:


  1. Preheat your oven to 180'C.
  2. Slice the butternut into cubes and place it into a baking tray.
  3. Sprinkle the spices over and mix it through.
  4. Cover the baking tray with foil and bake for 45 minutes.
  5. Remove the foil. Give it a quick stir. Then add the cranberries, feta and a light drizzle of honey.
  6. Bake uncovered for a further 15 minutes.


Sunday, 22 October 2017

Sugar Cookies with Royal Icing


 Seeing as I don't really have time to bake for orders anymore, I would love to share my sugar cookie recipe with you, so that you can make these yummies yourself.

This recipe makes the softest, almost melt-in-your-mouth biscuits - which my husband calls soft Zoo Biscuits. The icing adds extra sweetness that just blows your taste buds away with every bite. 

I haven't had a single unsatisfied customer (except my dad, who always complains that the cookies are too sweet - is that even possible?!)


Prep time: 30-40 minutes
Baking time: 180'C for 9 minutes
Makes roughly 40 biscuits


 Both recipes for the cookies and the royal icing can easily be doubled or tripled.


INGREDIENTS:


230g butter/baking margarine
1 cup sugar
1 teaspoon vanilla essence
2-3 drops almond essence
2 teaspoon baking powder
3 cups cake flour 


METHOD:

  • Preheat the oven to 180'C.
  • In a large mixing bowl, cream together SOFT butter and sugar. If you're anything like me and always forget to take the butter out of the fridge ahead of time, you can microwave the butter in a heat-safe mixing bowl until soft, NOT melted (usually about 30 seconds) and then add the sugar. Mix it together until soft and fluffy.
  • Add the egg, vanilla essence and almond essence and quickly mix it through.
  • Sift in the baking powder and flour - I add the flour one cup at a time. By the time you add the third cup of flour, you need to start mixing the dough by hand. The dough should be soft but shouldn't stick to your fingers.
  • For this recipe, the dough doesn't need to stand, so you can use it immediately.                                     

  • On a clean surface, sprinkle some flour and roll out the dough. I divide the dough in half so that it's easier to work with. Roll it out evenly to your desired thickness - I keep it somewhere between 0.5-1cm thick. 
  • Press out your shapes with a cookie cutter. You might need to dunk the cookie cutter into flour first so that it doesn't stick to the dough. Gently lift the cut-out shapes and place it on a greased baking tray. (I spray my tray with oil spray). 
  • Bake it for 9 minutes for a soft biscuit with crispy edges or longer if you want the whole biscuit to be crispy. 
  • Once you take it out off the oven, immediately loosen the cookies (I use a very thin-tipped spatula) and place them on a cooling rack. Be careful when you loosen the cookies coz intricate shapes can easily break.
  • While the biscuits are cooling, make the icing. 

ROYAL ICING:

2 tablespoons meringue powder
1/4 cup water
4 cups icing sugar
1/2 teaspoon vanilla essence
1 teaspoon caramel essence


  • I haven't found ready-made meringue powder in South Africa. But it's super easy to make: simply crush the meringues or grind them in a blender. Then sift it to remove any larger particles. I use store-bought vanilla meringues. 2-3 large meringues gives you about 2 tablespoons meringue powder.
  • Mix the meringue powder and water together with an electric beater. The powder will dissolve in the water and become bubbly.
  • Add vanilla and caramel essence and mix through.
  • Sift in the icing sugar, one cup at a time. Mix thoroughly - like for 5 minutes.                    

  • Separate the icing sugar into however many colours you need, and add food colouring. I love gel food colours but anything is fine. (Add as little colouring as possible to get your desired colour - this will help prevent the colours from running into each other)
  • To check the thickness: use a toothpick and draw a line in the icing, then count how long it takes for the line to disappear. I use 25-30 seconds for edges, 15 seconds for words, and 5 seconds for flooding. (If it's too thin, just add some more icing sugar. If it's too thick, SLOWLY add small amounts of water. )
  • Then divide each colour into 2 or 3 (for edges, words and flooding).
  • I use thick plastic bags as piping bags. Place the plastic bag into a glass to help keep it open, and the add the icing. Use an elastic band or clip to close the end of the bag. You can alternatively use proper icing bags or bottles with nozzles.
  • When you're ready to ice, cut a tiny whole in the tip of the bag for the edging and word icings, and a larger hole for the flooding icing.
  • Ice away! The icing needs to dry completely between layers (at least 1 hour) - or you can cheat like me, and put the biscuits under the air con to speed up the process. If the icing doesn't dry between layers, the colours will run into each other.
  • I usually let the iced cookies stand 24 hours before packaging them. 


Get inspired on Pinterest - you can follow me (Fatima Roomaney) and my many party boards with cookies for every occasion.